

How To Hydroponics A How To Guide To Soilfree Gardening
If you enjoy this post please help us by sharing it
Hydroponics is the art/science of growing plants in a soil-free environment. Historically, hydroponics isn't that new.
In fact, there are many ancient records of people using the concept of hydroponics to grow plants.

Hanging Gardens of Babylon
One such important record is the Hanging Gardens of Babylon, which is considered one of the Wonders of the Ancient World. In Babylon, they used gravel and stones to grow plants.
While the system is certainly more primitive than what we can create now using our own two hands, it's important to note that the underlying principles remain the same.
This hydroponics guide will give you a bird's eye view of how hydroponics works, how it actually grows plants and how you can start your own hydroponic system.
How Does Hydroponics Work

Hydroponic culture is soil-less, meaning, the soil has been completely eliminated from the equation. In place of soil, the grower uses a circulation system and hydroponic media to distribute water, nutrients, and air to the plants.
Pro Tip: Medium selection is a priority when setting up a new hydroponic system.
The safest combination is the coconut coir plus perlite combo (50/50).
The perlite provides adequate water and air distribution to different kinds of plants and is even used in conventional soil planting setups to improve the yield of crops.
There are a couple of reasons why people are shifting to hydroponics:
1
A greenhouse can obviously allow more plants to grow than a conventional plot of land.
A layer of pipes can be fashioned in a way that you will be able to plant double or triple the number of plants because other layers are elevated.
2
Water pumps for NFT (nutrient film technique) setups are becoming cheaper and setting them up is a breeze.
You can also cut power costs by creating a hybrid solar setup. We will discuss this shortly.
3
There are many types of media to choose from aggregated clay, perlite, coconut coir, rockwool, molded sponges, etc.
These media can be combined or you can use different media depending on the type of crop you wish to plant.
Is Hydroponics Hard To Do?
 Don't worry, this isn't a hydroponics setup!
The complexity of any system of growing plants depends on what types of plants you want to grow, how big you want your system to be and how efficient your system is.
 Generally speaking, smaller systems are easier to maintain and we highly recommend that you start with small systems so you don't get overwhelmed.
People have been relying on hydroponics for a long time! Remember the last time you had cut flowers in the house? What did you do to sustain its life for a few days?
You probably poured water in a vase and put the cut flowers there. If you're a bit savvy, you may have also added a bit of plant food to the solution to lengthen the lifespan of the flowers a bit more.
That is hydroponics! You sustained the life of a plant using a soil-less system.
The vase is the system, the cut flower is the 'crop.'
A large hydroponic system would, of course, have more parts because it's meant to support the growth of a planet from germination to harvest time.

Why Use Hydroponics Instead of The Normal Soil Method
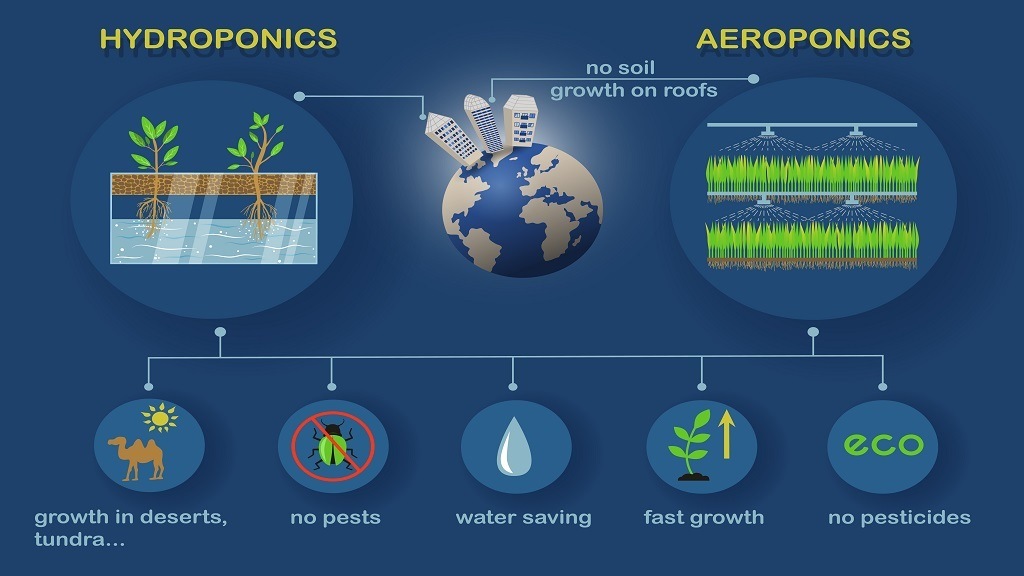 Aeroponics is also a type of Hydroponics.
For thousands of years, people have been relying on the land for agriculture. Why try hydroponics now? There are of course specific benefits that put this method of growing plants a cut above the rest.
1
Since plants will be growing in a closed, water-driven system, soil-borne pests will be eliminated.
The same applies to fungal infections and other diseases that are normally associated with growing plants on the soil.
Remember that soil is essentially a miniature ecosystem of its own, with bacteria, fungi, and insects comprising its food web.
When you introduce a plant to the equation, the plant usually becomes either food or home. Either way, it's not good news for the plant!
2
A hydroponic setup eliminates the growth of unwanted plants (weeds) around your plants, eliminating the need to apply herbicides. This will radically reduce the amount of work needed to maintain your crops over time.
3
Since herbicides and other chemicals normally used to control both plant and animal pests are eliminated, the hydroponic farmer's health is also safeguarded.
Apart from measuring and mixing the nutrient solution, harmful chemicals will not be part of the maintenance equation. There are also natural ways to ward off even the tiniest of pests, such as the use of fine screens to prevent entry into the growing tent.
4
The turnaround time between planting is greatly reduced because the hydroponic system can easily be adjusted to match the requirements of the current planting project, as opposed to the preparation needed to make soil ready for planting.
Soil preparation involves the application of various types of nutrients before the soil can be even considered viable for certain crops.
In a hydroponic system, the circulated water (also known as the nutrient soup/stock) can be chemically analyzed and measured at any point to ensure that the chemical balance is just right for new planting.
5
And finally, the maturation cycle of crops can often be reduced (in other words crops grow faster) as the nutrient solution can deliver an ideal mix of nutrients over a period of time.
Ideal conditions are almost never attained by soil alone; it's different when you're dealing with a circulating system.
The Roots of A Plant Growing Through Hydroponics
 The life of a plant in a hydroponic setup is dependent on healthy roots.
It is the only contact the plant has with the nutrient solution, and maintaining healthy roots is an utmost priority. One of the best ways to keep hydroponic plant roots healthy is ensuring they are oxygenated sufficiently.
When the roots of any plant (whether in a soil or soil-less environment) suffers from low or no oxygen conditions, the roots will shrivel up and die.
Water stagnation is another issue that needs to be addressed ASAP. A hydroponic system may be closed, but the water is still circulating, allowing the water to interact with the environment and exchange gas molecules with it (like the water in an aquarium with a pump!).
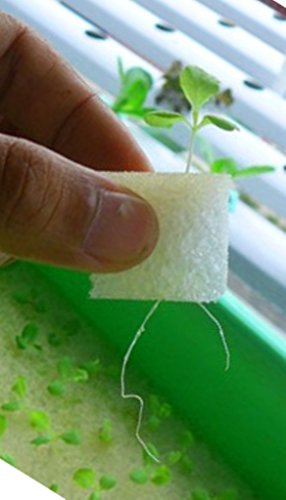
When you begin hydroponic culture, you will likely need to transplant seedlings from a smaller hydroponic setup to the main system.
Transplant shock happens when the roots of the transplanted plants die upon removal. The trick is to perform the transplantation slowly and surely. Don't rush the process – keep those fragile root hairs alive.
Also, keep the roots moist at all times. However, this shouldn't give you any wrong ideas: while the fragile root hairs of crops need to be kept moist, these can also suffer from being submerged in stagnant water, too.
Why? Stagnant water has low or no diffusible oxygen and the only way the roots can gain oxygen from its environment is by taking in pure elements.
Therefore, pure gaseous oxygen is required by the roots to remain alive throughout the transplantation process.
What Are The Different Types of Hydroponic Systems

Aeroponics
 – Aeroponics is a radical new way of using the concepts of hydroponics to the fullest. Instead of submerging the root mat in water, the roots of plants are misted with nutrient solution at specific intervals.
– The misting provides high dissolved oxygen and nutrients to the roots of the plants, and since the plants are suspended in mid-air, the oxygen zone is continually exposed to plenty of air.
Water and nutrients that are not utilized by the plants are drained back easily to a trough below, preserving the nutrient solution for recirculation and continuous misting.
– The big disadvantage of this system is it is highly reliant on the misting system. The roots of plants need to be continually moist.
When moisture disappears, the roots will soon shrivel up and die. When the pump and mist malfunction, the hydroponic grower needs to make sure that there is a backup mechanism that can continue the task of spraying/misting.
– The big upside of this system is the crop yield. Scientifically, crops that have been grown using the aeroponic system can produce yields that are ten times larger than what conventional soil systems and soil-free systems can produce.
This is a massive figure and we owe all this to the fact that aeroponics provides much higher oxygenation to the plant roots than other systems.
Pro Tip: A misting system needs a backup system too. A second smaller misting system can be put in place, or make sure that the roots of the plants can be lowered to a deep reservoir in the event of a power failure, in the event that you've decided to use an aeroponic setup.
– One of the solutions to pump failure is the introduction of a reservoir in the event of emergencies.
A reservoir can help maintain moisture and nutrient levels at acceptable degrees until the main pumps are brought back online.
Nutrient Film Technique (NFT)
 – The NFT is the most accessible hydroponic system because all you need to set it up are pipes, a framework to hold up the pipes, a small pump and a small reservoir for the nutrient solution.
– NFT is highly recommended for beginners due to its ease of construction and its relatively high success rate for most types of vegetables.
– If you're using only a single frame with three to four pipes, you will only need a small, motorized pump to recirculate water throughout the system.
The natural drainage system will distribute nutrients to all parts of the system.
Growth rates will remain excellent and additional nutrients can be added as needed.

The nutrient film technique is an innovation by Allen Cooper at the Glasshouse Crops Research Institute in England.
In a nutshell, the system utilizes a closed, recirculating dynamic that continually runs the nutrient solution through enclosed pipes.
The plants are placed in intervals along the pipes, with roots reaching downward, toward the nutrient film. The pipes are interconnected, with the topmost pipe draining toward the second one below, and so forth.
There is natural aeration inside the pipes (as the pipes are not completely filled with water), plus, humidity is controlled as there are no additional openings in the pipes apart from the holes where the actual plants are situated.
Humidity control is important as the last thing that we want to do is to dry out the roots of plants. The oxygen zone has to be minded, but too much air can kill plants, too.
PRO TIP: Assess electrical equipment daily to ensure that water and air are being circulated adequately. Damaged equipment can easily lead to crop die-off.
Eventually, water is drained back to the main reservoir where an electrical pump recirculates the contents back to the system.
The downside of the nutrient film technique is when plants begin to mature and the roots begin to form massive nets or mats that reach all the way down to the bottom of the narrow pipes.
The large root mats can result in water stagnation, which may eventually lead to root dieback.
Despite its shortcomings, NFT is rated as excellent in the hydroponic industry because of its ability to retain the nutrient solution (almost no evaporation happens because of the closed system).
Hydroponics Raft System (Deep Water Culture)
 – Hydroponic rafts are highly recommended for crops that have low stature, like lettuce and other mixed greens.
If you're planning to plant large volumes of these crops, I highly recommend the raft system.
Hydroponics raft system is also referred to as deep water culture.
How Does The Raft System Work?
Essentially, you have a pool of nutrient solution in a low-depth, artificial pond.
Styrofoam sheets are placed on top, with small baskets placed in holes cut into the Styrofoam sheets.
Plants go into the small baskets and the medium is submerged in the nutrient solution.
How Can We Prevent Stagnation?
 Obviously, a small pond doesn't flow (as with real-life ponds).
The pool of nutrient solution is connected to a drain and pump that recirculates water continually, keeping the water in the small pool rich in plant nutrients and dissolved oxygen.
The water is renewed from below, and the plants thrive on having high dissolved oxygen and a constant influx of plant nutrients. Stagnation is avoided.
– The raft method is very economical and thus, a favorite of growers who are looking to harvest 2-3 times their normal yield when they plant their low-stature crops on the regular soil.
What Does A Good Hydroponics System Look Like (The Setup, Not How Pretty It Is)
A hydroponic system is considered of high efficiency and value when it has achieved the following conditions:
1
The overall design is simple, easy to implement and relatively inexpensive.
2
Has been set up to be fully automated; the grower only needs to measure the nutrient solution and add water/nutrients as needed.
3
Maintenance is almost non-existence; the system takes care of itself 99% of the time.
4
Has been geared to support the type of plants that you want to grow in it in the first place.
For example, if your goal is to raise short-stature crops, your goal is to create an ideal raft system, because the raft system is appropriate for short-stature crops.
5
Does not waste the nutrient solution, or wastage is greatly reduced.
Any reduction in nutrient levels arises from the consumption of the plants themselves.
6
And finally, delivers the right combination of water, air, and nutrients so that your crops will not just survive, but thrive greatly in the hydroponic system.
What Are The Different Types of Hydroponic Media
- Coconut Coir
- Agricultural-Grade Perlite
- Clay Aggregate (LECA)
- Molded Sponges
- Rockwool
Note:You will see different names used for some of these. For example, Clay Aggregate is referred to as clay pebbles a lot of times. Just an fyi to help prevent any confusion.
This is one of the fascinating things about hydroponics. Yes, your plants will be growing in a soil-free environment. However, your plants still need a medium to anchor and grow on.
The medium or substrate will be replacing the soil that plants normally grow on. Another important function of hydroponic media is holding on to both water and air.
Roots need to be oxygenated and are only able to absorb pure elements when in contact with water. Early hydroponic systems made us of stones and sand.
Modern hydroponic systems have gone a long, long way and modern soil-less systems have now exceeded the performance of conventional growing setups for years now.
Your medium of choice is an important consideration if you want to profit from your hydroponic system.
Why is sand a generally bad idea for hydroponic systems? Plants can anchor on to it, right? The problem is with the interstitial spaces between the granules of sand.
Fine sand can't hold on to water and air efficiently. Large gravel, on the other hand, provides larger interstitial spaces for air and water, but unless your system recirculates the nutrient solution continually, water just passes through the large gaps between gravel particles.
Four of the most commonly-used media for hydroponic systems include:
– Coconut coir
– Agricultural-grade perlite
– Clay pellets
– Gravel
You may use any of these media types to get started. I personally recommend mixing equal parts of coconut coir and agricultural-grade perlite to vastly improve the water and air holding capacity of coconut coir.
If this doesn't work, feel free to try other combinations. There's a reason why these four media types are well-loved by hydroponic growers around the world!
Understanding The Differences Between These Mediums
Coconut Coir
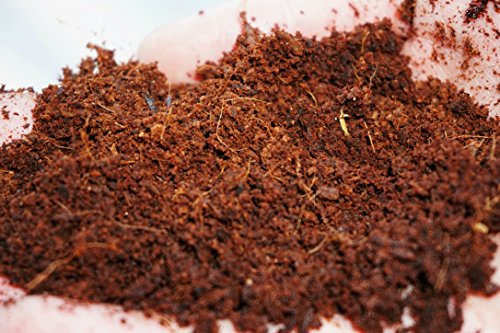 We thought that coconuts are only fascinating because of their juice and 'meat.' Turns out, the emptied husk of the ever-versatile coconut is one of the perfect media to ever hit the hydroponic industry.
– Coconut coir is rich in natural plant hormones, naturally resists fungal infestations and allows the healthy spread of the finest root hairs.
– The fibers of the coconut husk are naturally resistant to sun exposure as coconuts have evolved through millions of years to survive being floated on the ocean until they are carried away to a viable sandbar or island, where the coconut can finally germinate.
There's a reason why 'castaway islands' are always drawn with coconut trees. 'Castaway' coconut trees are real!
– The most popular type of coconut coir is the compressed briquette. Coconut coir briquettes need to be pre-soaked before use.
After opening, submerge your briquettes in at least one gallon of water.
You will know that the briquettes are ready for use when a single briquette expands to up to six times its original size. The physical expansion is what we're after – it means that medium can hold a lot of air and water.
– Another fun fact about coir: it's not messy to use at all! If you get fibers on your clothes, all you need is to brush it off. Your hands will stay clean while handling it, too!
PRO TIP:Mix 50% perlite and 50% coconut coir to increase medium permanence.
Agricultural-Grade Perlite
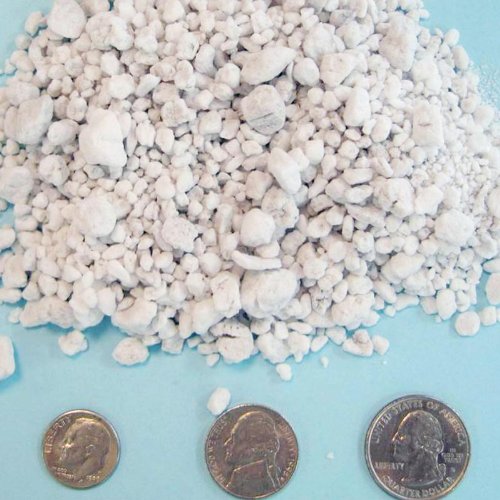 Agricultural-grade perlite is one of the oldest media used for hydroponics. It is widely available, light, with a physical structure that makes hydroponic gardening a joy.
– Perlite also has high permanence, which means it can grab hold of nutrients, water, and air and maintain its hold on these three until the plant roots require them. This makes agricultural-grade perlite very root-friendly, indeed.
– Is often combined with soil to improve the growth rate of plants (imagine – it helps soil!)
– Perlite is also sterile and can tolerate changes in nutrient broth chemistry. It resists fungi and weeds, which is a plus in closed systems with lots of water, where root dieback is a big issue/possibility.
– Due to the lightness of the material, agricultural-grade perlite is not appropriate in 'flood and flush' systems as it can be easily carried away by flowing water.
Pure perlite systems are also out of the question for outdoor systems as wind and rain will easily carry it away, too.
– So when is it a good idea to use perlite? Perlite's permanence and expansive capacity is something to consider. It can definitely deliver the kind of retention that will benefit most crop varieties.
But the fact that it can easily be carried away by water is problematic. So like I said earlier, 50% perlite plus 50% coconut coir is a done deal for beginning setups!
Clay Aggregate
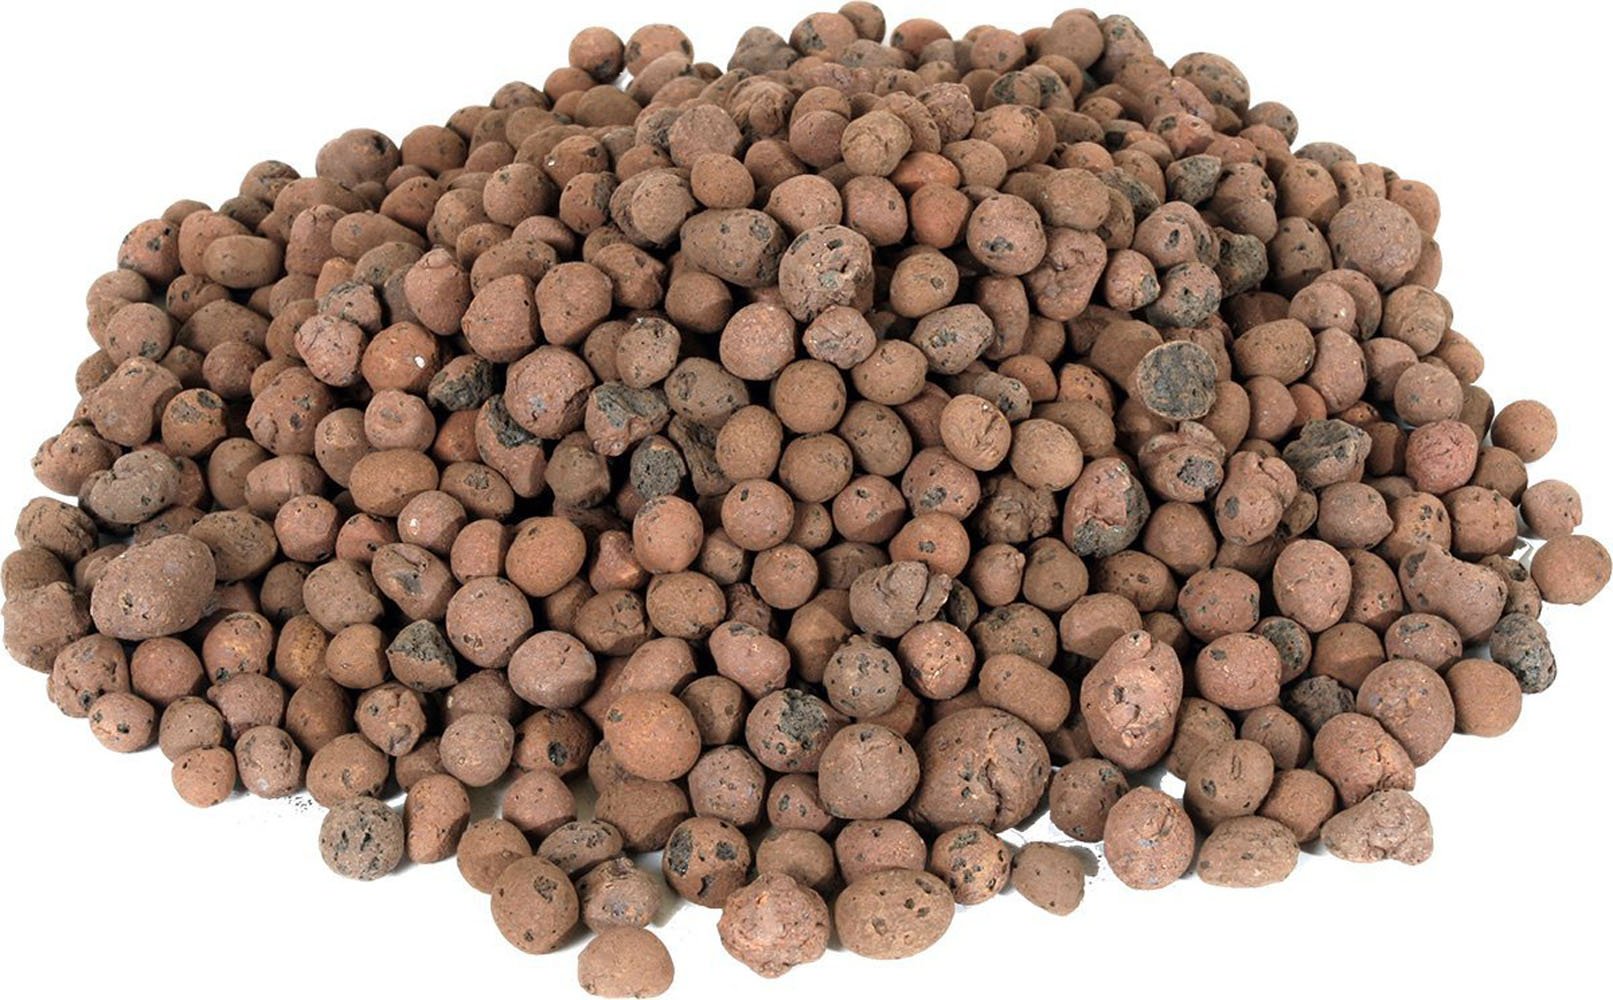 Also known as LECA or lightweight expanded clay aggregate, this type of medium has moderate water and air retention is denser and heavier than agriculture-grade perlite and is widely use in hydroponic systems, too.
– What makes LECA ideal for hydroponics is its pH neutral status, which is quite important for maintaining a healthy system.
Checking the pH of the nutrient solution is imperative because long-term changes can 'burn' the roots of plants.
– Lava rocks appear to have the same qualities as LECA. There are two problems with lava rocks that make them inappropriate for hydroponic systems.
One, they are not pH neutral and two, they suffer from sedimentation (from erosion) over time and the tiny sediments can damage equipment. Broken equipment can kill plants!
Molded Sponges
 Molded sponges are considered the 'miracle medium' of hydroponics.
– Manufactured from a combination of compost and polymer, molded sponges are especially useful for germinating seeds and preventing transplant shock.
– The structure of molded sponges not only hold water and air in perfect proportions but also guide the hair-like roots of germinating plants so that they 'seek' outward (the way they do in soil) instead of growing in mixed directions, which is the main problem that hydroponic farmers encounter when germinating seeds.
– Molded sponges like Perfect Starts are classified as organic media, these sponges will not disintegrate during transplantation and will not leave harmful sediments that can clog and damage delicate equipment.
Unlike perlite, molded sponges are adequate performers in all kinds of hydroponic systems.
Rockwool
 Rockwool has been around as a hydroponics medium for about twenty years.
– It is manufactured from molten rock. Molten rock is spun into fibers, aggregated, and then re-compressed as bricks.
The resulting bricks can readily absorb water, air, and nutrients.
As the surface is porous, with viable interstitial spaces, water also drains decently.
– Rockwool is lauded because of its pH neutrality and being free of any pathogens that can harm seedlings and cuttings.
Large slabs of this material can be used for years to maintain large tracts of hydroponic crops.
– Rockwool is highly reusable. It can be reused for planting after steam-sterilization.
– One downside is that it produces a fine dust when first removed from its packaging.
This fine dust has been known to cause skin allergies, which has led me to believe that it may also cause respiratory issues if you happen to inhale large volumes of the dust. Caveat emptor, in this case.
The Different Types of Hydroponic Setups (Not Systems)
Now that you know the history and various media used to grow plants hydroponically, it's time to take a peek at the various hydroponic systems themselves.
PRO TIP: Always check the main reservoir for any cracks or leaks.
Basic: Sand and Gravel Hydroponic System
Sand and gravel systems are considered the most basic, 'nitty-gritty' of all hydroponic systems.
Yes, plants can survive in this system but the fact remains that sand normally has poor aeration.
A sand and gravel system can be fed water and nutrients by a small air pump. As long as the nutrients are there, you'd be surprised at the type of media that plants will accept as growing media.
Think plants growing in cement cracks. Cement cracks are not ideal, but there are moisture and nutrients there, so some small plants find the cracks alright to grow in.
Now, when the roots of plants don't get sufficient air, poor aeration results. And this situation leads to… you guessed it right – root rot!
As I've mentioned before, maintaining pristine roots is essential for keeping crops healthy.
Why do plants need air 'down there?'
People generally attribute plant respiration to the leaves – and rightly so, because leaves do interact with all sorts of variables in the environment, not just air and moisture.
However, it turns out that the roots of plants also breathe! Yes, they respire 'down there.'
The roots are considered an 'oxygen zone,' too, which necessitates tilling and aerating the soil ever so often when plants are planted in soil.
When you're dealing with a hydroponic system, obviously, you can't just take a trowel and tamp on your substrate to improve aeration.
The medium has to be efficient on its own in providing sufficient surface area for respiratory exchange to occur between the roots and the water.
The Dutch Bucket Hydroponic System
Aptly named because the system was first used in Holland, the Dutch bucket system is one of the easiest systems to create and implement.
This system is appropriate for commercial growing setups for long-term crops such as tomatoes and cucumbers.
The hydroponic farmer is free to use any kind of medium, be it coconut coir, perlite, coir-perlite mix, rockwool, etc.
Here's how it works: the 'bucket' is actually a 2.5-gallon plastic container made of heavy-duty plastic.
It is recessed on one side so that it sits on top of a 1.5-inch pipe that serves as its flush or drain.
The recess raises the draining point of the bucket, leaving a reserve layer of water below.
This reserve layer is continually renewed as the bucket is fed new nutrient solution via a double drip. A quantity of solution is always available in the bucket (i.e. the Dutch bucket does not fully drain) in case something happens to the double-drip system and the buckets are left with no new water for a certain amount of time.
On the other hand, too much water in the bucket can cause stagnation, which is also bad for plant roots, thus, necessitating a continuous drain system that brings back the water to the main reservoir.
Rockwool Slab Drip Hydroponics System
Rockwool slabs are massive media for growing crops hydroponically.
These slabs are easy to install, easy to use and can be used to grow plans like tomatoes to full maturity and beyond. In fact, many commercial hydroponic growers use rockwool slabs to 'air layer' tomato plants so that the plants will extend to up to 40 feet in the air!
Strings are used to support the tomato vines, allowing the bottom of the vines to thrive while allowing for maximum growth.
The downside of the system, of course, is that there is a run-off.
Water being dripped onto the slabs will eventually percolate to the bottom of the slabs and drain away to the floor of the grow tent.
Proper drainage is necessary to prevent stagnant water from inundating the grow tent, especially if all of the plants are planted on rockwool slabs.
The Ein Gedi Hydroponics System
– The Ein Gedi system was developed in Ein Gedi, Israel.
– It is a hybrid system that does away from with the usual drip system.
– Instead of relying on the natural percolation of water to the root zone, what the Ein Gedi system does is it sprays or mists the roots of the plants.
The misting introduces such a high amount of dissolved oxygen to the roots that plants grow vigorously over a shorter period of time.
– What about the rest of the roots? As the root mat expands, it grows beyond the spray-able zone.
But no worries! Right below the spray zone is a small pool of nutrient solution that is also recirculated vigorously.
The nutrient-rich solution is also high dissolved oxygen and prevents stagnation and root dieback.
– The Ein Gedi system is fully enclosed. Imagine a box or frame, with fixed baskets inside.
A small pipe mists the spaces in between the plant baskets, introducing O2-rich and nutrient-rich water to the plant roots.
– This hydroponic system is highly recommended for growing healthy seedlings and growing cuttings.
Can be used indoors and is relatively easy to set up.
The main water reservoir is placed below the main frame of baskets and drainage is direct and easy to spot and measure.
What's The Best Way To Power Your Hydroponics System

Hydroponic systems require continuous power to run, especially if you're using a recirculating system to drive water to the plants and back to the main reservoir.
Obviously, the most reliable source of power would be an AC tap.
However, some people want to save power while reducing their overall carbon footprint.
How can you do this with your hydroponic setup?
The answer is solar power. A hybrid solar setup can run your greenhouse completely "off the grid" provided that you do things properly.
I will provide a basic rundown of the things you will need to create a solar set up that will run your greenhouse with the power of the sun completely, day and night.
For this project, you will need a solar or car battery (or batteries), appropriately-sized wires, a low-voltage DC breaker, solar panels (100 watts or more, depending on the electrical load), DC-AC inverter, voltage regulator and an SCC or solar charge controller.
Framework For Setting Up A Solar Panel For Your Hydroponics System

1
Set up your solar panels securely. Make sure that your frames are properly angled so that your solar panels will catch the maximum amount of UV rays from the sun.
Do not position your solar panels under a tree.
Full exposure to the sun is necessary. Shade can vastly reduce the available power to your solar panels, reducing the efficiency of your solar setup.
2
Connect your solar panel to your low voltage breakers. Make sure that you are connecting the wires from your solar panels to LOW VOLTAGE DC BREAKERS.
Setting up anything electrical (including solar panels) can be dangerous. We recommend either hiring an electrician or doing thorough research if you decide to do it yourself.
These are different from your usual 5 amp or 15 amp AC circuit breakers.
DC breakers are designed to respond to short-circuits resulting from very low voltages (10 volts or less) whereas AC circuit breakers expect voltages of at least 100 volts in order to function normally.
The task of low voltage DC breakers is to make sure that the line coming in from the solar panels, in the event of an electrical catastrophe, does not burn the entire setup.
3
Connect your SCC to the solar battery or car battery. Large-capacity car/truck batteries are perfect for hybrid solar setups.
The capacity of a battery is measure in amp-hours.
DC batteries come in a variety of voltages; solar setups normally use 12-volt batteries or 24-volt batteries.
Larger-capacity 24-volt batteries are more expensive but last longer and provide more power over the period of a day.
4
Connect your battery to the DC-AC inverter. The job of the inverter is to convert direct current (DC) from the battery to alternating current (AC) which can be used by equipment and appliances running on AC power.
Household appliances run on AC power.
5
Connect the inverter to your power regulator. Your power regulator will serve as a breaker, too.
In the event of a short circuit, the power regulator's fuse will blow, which should help protect against fires that may result from shorted wires.
Here is a video of a solar panels being connected to car batteries for his hydroponic setup.
If you're up for it, you may install a separate circuit breaker and plug your voltage regulator to that too. The AC circuit breaker will protect the line going to the inverter.
Optional: you may connect your power regulator to a multi-tap extension setup.
I highly recommend using only heavy duty extension taps with built-in circuit breaking mechanisms.
Normally these taps have a reset button. Lightning-protect taps are also highly-prized as greenhouses can be hit by lightning.
A lightning-protect tap will switch itself off in the event of an extreme power surge, saving your equipment from instant damage.
Your new setup will function this way:
1
In the morning, your greenhouse will be feeding off the sun's power as the sun will continually recharge the battery.
2
At night, your battery/batteries will have a full charge, which means your greenhouse will continue running on battery charge alone until morning comes and your battery starts charging again.
3
Since there are plenty of safety measure installed, the solar setup will be safe operate on autopilot.
Just make sure that in the morning you check the readings on each part of the system so that you know that your setup is working normally.
Pro Tip: Create a backup power source for your hydroponics system so that you can save your crops in the event of hours or days-long power failure.
How To Grow Fruits & Vegetables With Hydroponics
 Can you grow fruits and vegetables with hydroponics? Yes, you can & we'll go over how to do just that.
In recent years there has been an increase in the interest in hydroponic gardening because of the wide availability of tools, media, and equipment for sustaining hydroponic gardens of any size.
So whether you're planning to experiment with a few plants or a whole greenhouse full of them, the technology and systems are already available to sustain your DIY hydroponics project.
Which Fruits & Vegetables Don't Grow Well With Hydroponics & Which Do
Generally speaking, both hydroponics and aquaponics setups are open to a huge variety of crops from tomatoes to mint to strawberry.
There aren't really restrictions when it comes to hydroponics, but there are impractical crops that just don't sit well with the general design of hydroponics setups that were meant to save on space and be separated from the rest of the environment (i.e. in a greenhouse).
Our rule of thumb is to avoid plants that take up a huge amount of space, like watermelon and corn.
As you can imagine, corn plants plenty of space and you will only be able to rear one huge corn plant per half meter of space.
That's too much space, to be honest, and these crops are better off in conventional farming setups.
The same applies to pumpkins and other vegetables that can grow to gigantic proportions.
These must be farmed outside the greenhouse or hydroponics system, where they will be able to enjoy all the space they need to grow and expand.
While they can theoretically be raised in a small greenhouse, do you really want all that space to be eaten up by say, one huge pumpkin?
We don't think so. Every meter maters in a greenhouse, since you want maximum production with all the space that is available to you.
Of course, you're still free to experiment with the crop choices. In any case, you will be the one performing the adjustments alter on.
But bear in mind the size and space constraints of your greenhouse and how much resources you are willing to spend on rearing these crops.
Now if you're interested in crops that are tried and tested in greenhouse, we have a couple for you.
These are the best of the best, and have shown excellent performance in hydroponics setups.
1. Flowers
Yes, flowers! If you have ever dreamed of having a variety of flower species all in the same system, then you can now, with your hydroponics setup.
Flowers are relatively easy to grow hydroponically and require minimum monitoring because many flowers are hardy and adaptable.
Cutting and transplantation can be performed when the seedlings have attained appropriate size, too.
2. Anise
A favorite in many regional and international cuisines, anise is an annual that grows flat, white flowers and has a supreme, savory flavor fit for various soups and stews.
Plant your anise seeds in spring when all possibility of plant frost is way off the radar.
Anise is one of the easiest plants to propagate because after just one month of healthy growth, you may begin collecting viable seeds from the flowers and replant them, if you want more anise crops in your system.
3. Basil
Basil is a high-demand crop used in pizza, pastas, stews and all kinds of recipes.
Commercially viable and of high demand for decades, the basil plant grows extremely well in hydroponic setups and can be trimmed or fully harvested after one season of growing.
In small-scale, passive indoor systems, it is quite common for growers to pinch off leaves as needed and they just let the plant mature and grow more foliage.
4. Catnip
Catnip is a perineal herb that can be planted straight from the seed and harvested after fifteen weeks. This crop should be planted in early spring (beware of frost).
Plugs are usually ready after eight weeks, while saleable plants are ready five weeks after mature plugs are ready.
Catnip is popular with feline owners as this relative of the mint plant produces a mildly hallucinogenic affect on cats when feed in small quantities.
5. Chamomile
Yes, you can actually grow the plant used to create relaxing chamomile tea. Fortunately, this plant adapts well to hydroponic culture as long as it gets the full strength of sun.
If there is some shade, that's alright, but you may need to use supplemental lighting if the shade is too much and for most of the day, the chamomile plant does not receive a good dose of sunlight.
Plant ten to twelve weeks before sale of the crop to ensure full growth.
It will take about six weeks before seeds grow into mature plugs, and from plugs, you will need another four to six weeks before maturity is attained.
6. Dill
Dill has been a kitchen favorite in the United States and elsewhere since heave knows when and is frequently used to flavor soups, roasts, fried food, pasta, pizza, etc.
It is an all around seasoning herb and is fortunately also adaptable enough to grow in a hydroponic setup.
It would be best to have a stash of additional dill seeds so you can replant every month as these grow fairly quickly and can be 'spent' just as quickly.
Another alternative is making multiple cuttings from a single mature plant, so you can get two to three viable cuttings from just one healthy dill plant.
7. Fennel
Fennel is another great annual that has high market demand and that can grow up to four feet upon maturity.
Often mistaken for dill because of its color and general appearance, fennel has a slightly more powerful taste than dill and is best cultivated in spring when there is plenty of sun.
Fennel prefers full exposure to the sun, though a little shade will not be detrimental to it. If your greenhouse has poor lighting, supplemental HID or LED lighting is recommended.
Just make sure that your greenhouse has proper climate control so that it doesn't overheat.
The fennel plant is edible from the leaves down to the seeds. Highly marketable, easy to cultivate and definitely a crowd favorite.
8. Lavender
Sweet-smelling lavender is used to create perfumed pouches, tea, aromatic oils and various other products.
It is purported to have medicinal properties and is the components of innumerable personal care products from soaps to lotions to hand washes.
Lavender seeds must be planted at least twenty weeks before intended date of sale. If you can move that up to twenty six weeks, then do it, for more foliage and better results.
How To Hydroponics A How To Guide To Soilfree Gardening
Source: https://originhydroponics.com/hydroponics-guide/
Posted by: smithloond1969.blogspot.com
0 Response to "How To Hydroponics A How To Guide To Soilfree Gardening"
Post a Comment